Multiplayer 1. The basics

I've been playing with games development since I was at school and I've finished a total of 0 games. 0. Not a sausage. Oh, I've started loads, of which a large amount of them have been top-down or isometric strategic shooters (for that I blame Rebelstar Raiders) but never quite got around to finishing them.
Ok, that last bit's a lie, I've never even come close to finishing them and I'd guess that's because games can be really complex. Like, super complex. If you've got a good game mechanic working, you still need to create the scaffolding around it and vice-versa. Then on top you've got the graphics, sound effects, etc. Without all of these you just have a tech demo.
So that's where these blog posts come in. These are not necessarily for anyone else to actually find useful, but I hope you do as otherwise it's just a wordy rubber duck.
And because nothing's worth doing unless it's needlessly complex and overly long, (the normal mindset of a developer) we're going to try and cover creating a multiplayer game from scratch using Unity. What these blog posts aren't going to cover is learning how to really use Unity and code in C#, but there will be some stuff to copy-and-paste.
First steps then, we're going to be using Unity's multiplayer networking stuff. They do, in fact, have a good demo on it that's worth reading through at some point, but I found it a bit like a classic Tom and Jerry sketch:
As such, I'm going to borrow and condense their first 9(!) steps into 1 simple one, and then go off on a tangent from there. Mainly, to focus on creating the scaffolding before coming back to the game and then maybe even some design and texturing.
The basics
Important theory for multiplayer then, Unity's multiplayer networking is based around having an authoritative server, so every piece of important information is sent to the server first, before being sent to each client. This means that whenever you want to see if something important has happened, such as a bullet has hit something like a player, a wall, a platypus, etc, you'll check that on the server and tell the clients what happened.
So everything happens on the server first, I hear you cry?! Err, no. That would be a lot of data to pass around, so player-controlled objects will be dealt with locally and then have their values sent to the server. To prevent cheating you'll want to confirm that they're not moving supernaturally, but we'll worry about that later.
When it comes to objects that aren't under direct control, then you'll probably be best syncing their initial start position and then relying on deterministic movement (an object's exact position and trajectory that can be calculated) to make sure they look the same on all clients without too much network traffic. This is fine as you're only checking on the server what's really going on anyway, so you're OK to fake it for things like bullets or other collisions.
Let's get started
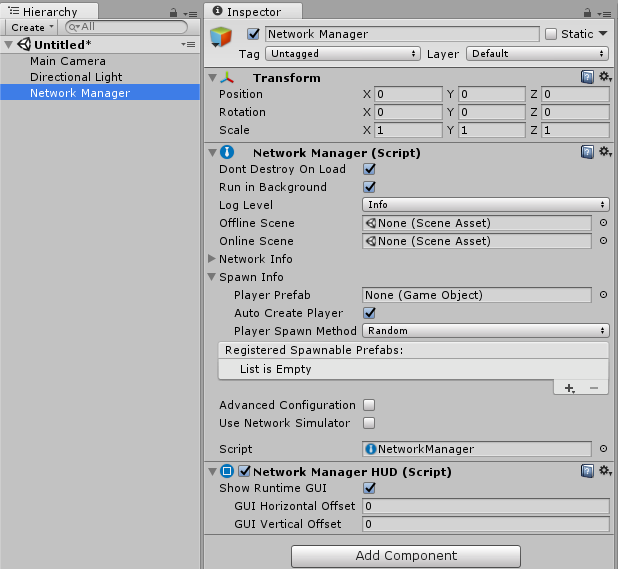
We want to create a multiplayer game so first up we need a network manager object. This is going to handle the basic communication and creation of a server and / or client until (spoiler) we replace it with something better later on.
To this, we're going to add the default HUD. This next part is really important, so remember this: don't ever use it for a real game. It's hideously ugly and will make you die a little inside every time you cast you eyes over it. I'll add a photo of it later, but also some warnings to prevent accidental exposure.
Recreate the following in your Unity, in a new project and scene:
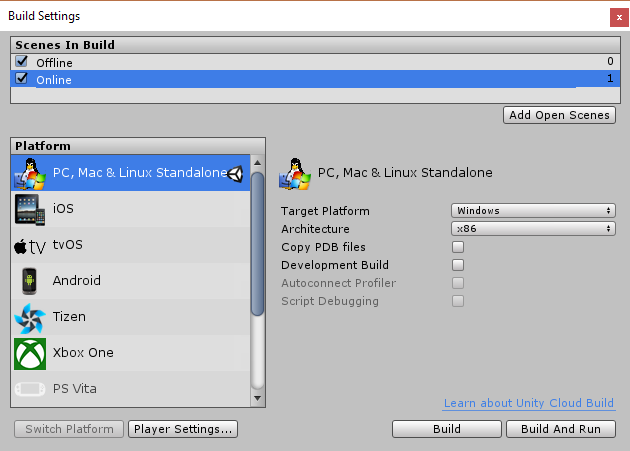
Save this scene as "Offline" and and create another empty one. Save this new one as "Online" and then switch back to the first. The "Offline" scene will be our main menu and host / join UI, and the "Online" scene will be our actual game.
Before we can use these scenes though, we need to tell Unity they belong to our game. Go to File > Build & Run. Drag your Offline scene into the Scenes In Build section and check it's row has a number 0 at the end. This 0 means that when you start your game, this will be the first scene to be run. Now do the same with the Online scene, although it will have a 1 at the end of it's row.
We've got a network manager waiting so we can drag these scenes into the Offline Scene and Online Scene options, shown above. Doing this tells the network manager what to show when we connect and disconnect from our server.
Next we'll need a player object to represent us. For this, we're not going to be particularly fancy, or even mildly fancy. An inanimate, carbon rod is going to be considerably more fancy than us. We're going to be a cube. 6 sides. Grey. Like an unloved, early-concept, weighted, companion cube. call this "PlayerPrefab".
We're also going to add a Network Identity component to the player. This is so we can control this object locally and send the new coordinates to the server. Without this, the authoritative server model that Unity uses will reject any requests to tamper with an object it thinks it controls.
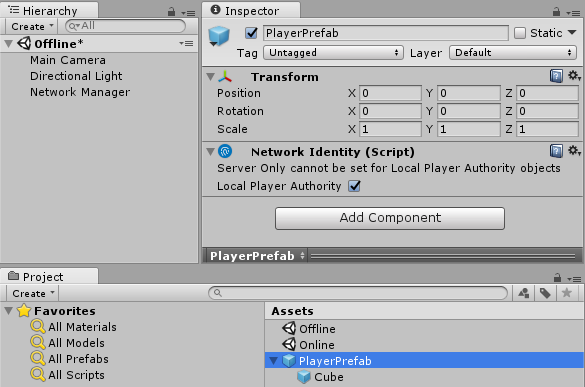
After creating the above prefab, drag the prefab Player into the Network Manager > Network Manager (Script) > Spawn Info > Player Prefab. This means that if you start a new game now, you'll get your little grey cube, which will also be inanimate as we've no way of controlling it.
Let's rectify that control issue then. No, not give it legs - that'd be silly and a waste of effort for the moment. Let's make it act like a very lazy Dalek and get it to float around the floor, controlled by the standard WASD key commands.
Create a new C# script and call it Player.Control. Copy the following code and paste it into the script. This class extends NetworkBehaviour, which gives us access to a lot of interesting network-related features, such as the OnStartLocalPlayer method. We'll see this a lot later.
Regarding the code itself, we first check that we're only allowed to move the local player object. We then handle the movement, and then lastly we make ourselves blue (#Yo listen up here's a story#).
The reason for making ourselves blue is simply to tell us apart from all of the other grey cubes. We're still grey at heart though, even if we've given our cube a lick of paint.
// Player/Control.cs

using UnityEngine;
using UnityEngine.Networking;

namespace Player {
    public class Control : NetworkBehaviour {
        public void Update ()
        {
            if (!isLocalPlayer) {
                return;
            }

            var x = Input.GetAxis("Horizontal") * Time.deltaTime * 150.0f;
            var z = Input.GetAxis("Vertical") * Time.deltaTime * 3.0f;

            transform.Rotate(0, x, 0);
            transform.Translate(0, 0, z);
        }

        public override void OnStartLocalPlayer ()
        {
            FindObjectOfType<MeshRenderer>().GetComponent<MeshRenderer>().material.color = Color.blue;
        }
    }
}
Now you've got this code, add this as a component to the PlayerPrefab. If you were to now play as the Host, you'd be able to move around, but no one else would know.
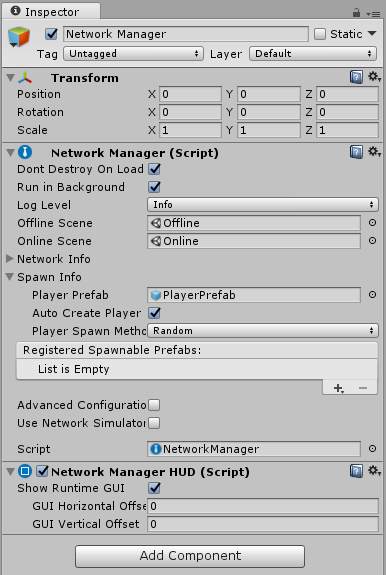
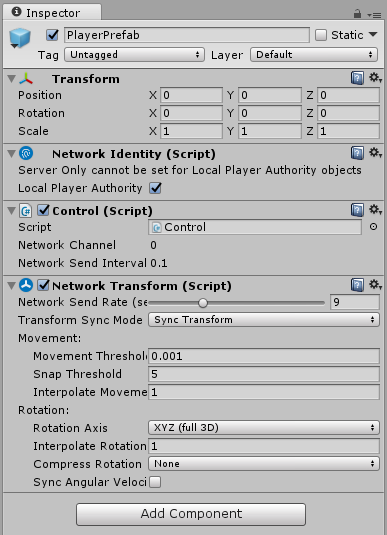
So lastly, we want to add a Network Transform component to the player prefab. This duplicates the movements of our player to the server, and also handles moving other player objects when told to by the server. Your PlayerPrefab should now look like the following:
It's always more fun with someone else though, so let's save and build this code so we can see it working properly. Click on the File > Build & Run and save your build somewhere. I recommend a folder called Builds. You could go with "Mr Wibble's wild ride" but that could get confusing, unless that's the name your game. In that case, it's an awesome name and don't let anyone tell you otherwise.
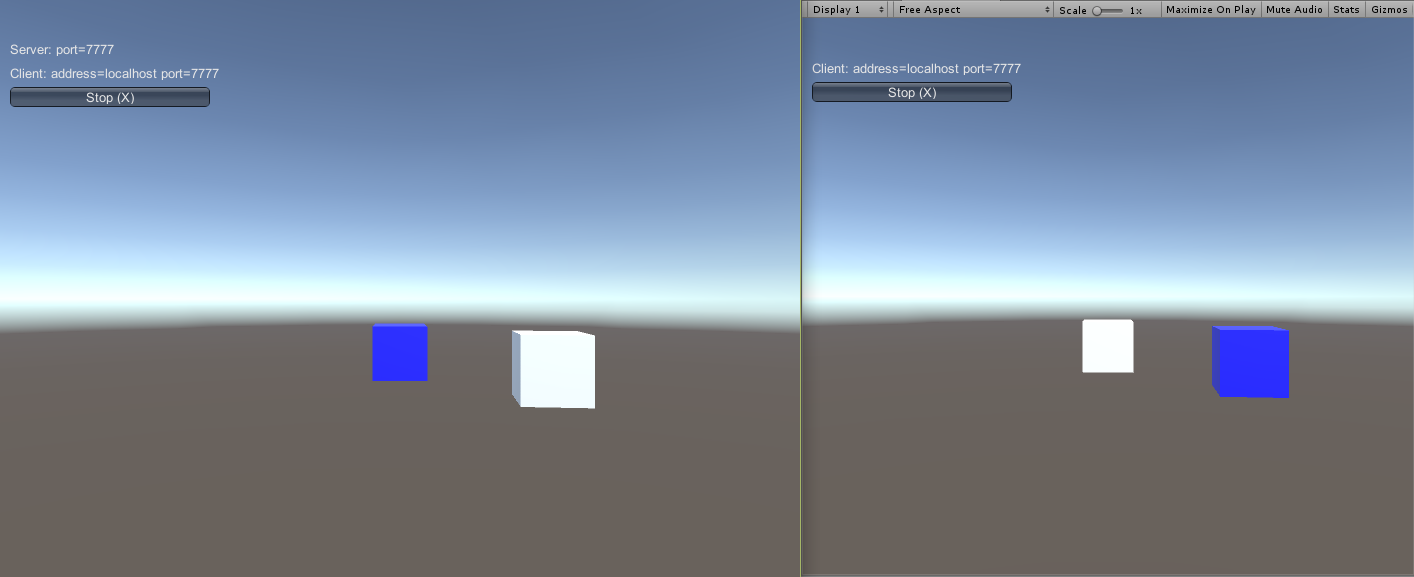
Once it's built and running, also run the codebase in Unity using the play button at the top of the window. Set one as the LAN Host and one as LAN Client. You should be able to see a blue box in both screens. It may also be the white one instead. They both occupy the same space so it's down to Unity which one to show you.
Choose one of the game instances and use WASD to move them around. This is likely to be a bit jerky in the other screen but you should see it moving there too. The reason for the jerkiness is the Network Transform is only sending update 9 times a second. We'll revisit that in a later post.
Warning, you're about to see some of the default Unity networking HUD! Avert you eyes now!
Summary
There we go then. It's the end of the first multiplayer blog post and we've covered getting basic communication up and running, and then controlling your player.
Next up is going to be looking at that HUD and trying to give us something that feels a bit less like you want to vomit out of your eyes. (Have you guessed how much I dislike their design yet?)
If you want a shortcut to copying and pasting, check out the code at github.com/dittto/unity-multiplayer-1 .