Multiplayer 2. A mockup of things to come

In the first blog we got a very, very simple multiplayer setup working. Nothing you can really use for a real game, but an OK proof of concept. This time, we're not going to start with what we said we would before. We're not going to replace the HUD just yet, instead we're going to focus on a mockup of how the different multiplayer states will work. (This does unfortunately leave us with the ugly, ugly, ugly HUD for a few moments more).
The reason for this is because this is actually the second time I've written this post. The first was focused around using Unity's NetworkLobbyManager. Unfortunately, it's not a great piece of code that's hard to work with, hard to extend, and seems to have issues with repeated connections and disconnections. To top it off, I didn't like how the lobby was the same the scene as the offline menu as it resulted in having to constantly check my code for what state it was in.
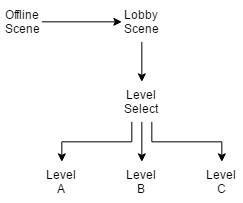
What we're going to do instead is ignore it and create our own, because that's not crazy at all. Who said that? Me? OK. We're going to have a different scene for every thing we do. There's a little diagram below of what we could use the scenes for:
For this blog, we're going to focus on the basics behind the lobby - the setting and storing of values, and on jumping between scenes (levels in this case) while keeping those set values safe.
To start then, open up the Player.Control from the last blog and remove the OnStartLocalPlayer()method. This is because all it does it change colour and that's the value we're going to focus on setting and storing. Why? It's a nice and easy variable to see changes on.
Scene change
This is how we're going to change the scene so we can test our code's working well. As you can see it's currently very, very complex code...
// ChangeSceneButton.cs

using UnityEngine.Networking;

public class ChangeSceneButton : NetworkBehaviour
{
    [Server]
    public void ChangeScene (string sceneName)
    {
        NetworkManager.singleton.ServerChangeScene(sceneName);
        // TODO: show loading screen
    }
}
This code can be easily extended to allow us to display a loading screen. We're also probably going to want to wait until every client has loaded and is ready before we display the new scene but we'll save that for a later day.
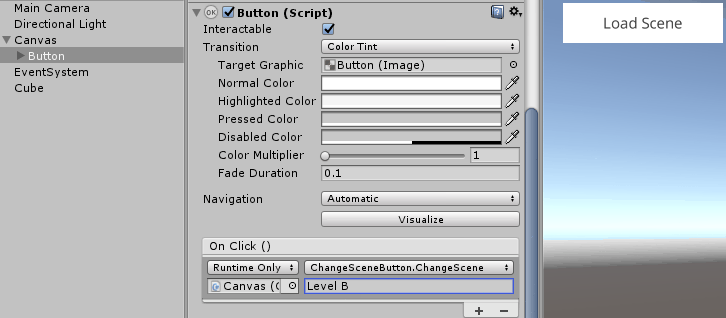
We're going to attach this code onto a UI button in every level scene. This is so we can easily test our code works by changing scene when we want to.
You may have noticed the [Server] attribute on the ChangeScene() method. This means this method can only be called by the Server. This is useful for the command called by it, but means you need a client who's also the server so you can use the button. For our tests, there's no code behind displaying the buttons so they'll appear to both client and server, but they'll only work for the server.
To make this code work, create a button as described below in our "Online" scene. We'll get around to the rest of the UI changes later.

It's the settings that make a player
This'll now change scene, but every time we do, we'll lose all of the previous information we know about a given player. To solve this we're going to store it between scene changes.
The concept of a scene change can be a bit odd. You load some new game objects and code into the game, but the game itself is still running in the same state as before. This means that why you lose some data, you can use simple singletons to keep state for you.
With the code below, we're going to keep a player's state on their local machines. The state is only recalled when a new player object needs to be created, so there's no hardship storing it on the client. If you're worried about data security for your game, you could always store all the player's settings on the server and just re-send them back to the client.
// Player/SyncedData/LocalPlayerDataStore.cs

using UnityEngine;

namespace Player.SyncedData {
    public class LocalPlayerDataStore {

        private static LocalPlayerDataStore instance;

        public Color playerColour;

        private LocalPlayerDataStore () { }

        public static LocalPlayerDataStore GetInstance ()
        {
            if (instance == null) {
                instance = new LocalPlayerDataStore();
            }

            return instance;
        }
    }
}
As promised, it's little more than a simple singleton with a parameter of Color stored with it. As long as we remember to always update this store whenever we update a local player's colour, and we remember to always read from here when a new player object is created, then this should work well.
Note that this a plain old C# object, so there's no need to attach it to any other game object or behaviour. As soon as it's called it's as if it's always been.
Changing of the colours
Next up I'm going to wander through a pattern I'll end up using a lot for keeping data synced between server and client. We'll start with the code, as why not?
// Player/SyncedData/PlayerDataForClients.cs
using UnityEngine;
using UnityEngine.Networking;
namespace Player.SyncedData {
public class PlayerDataForClients : NetworkBehaviour {
public delegate void ColourUpdated (GameObject player, Color newColour);
public event ColourUpdated OnColourUpdated;
[SyncVar(hook = "UpdateColour")]
private Color colour;
public override void OnStartClient()
{
// don't update for local player as handled by LocalPlayerOptionsManager
// don't update for server as the server will know on Command call from local player
if (!isLocalPlayer && !isServer) {
UpdateColour(colour);
}
}
public Color GetColour ()
{
return colour;
}
[Client]
public void SetColour (Color newColour)
{
CmdSetColour(newColour);
}
[Command]
public void CmdSetColour (Color newColour)
{
colour = newColour;
}
[Client]
public void UpdateColour (Color newColour)
{
colour = newColour;
GetComponentInChildren<MeshRenderer>().material.color = newColour;
if (this.OnColourUpdated != null) {
this.OnColourUpdated(gameObject, newColour);
}
}
}
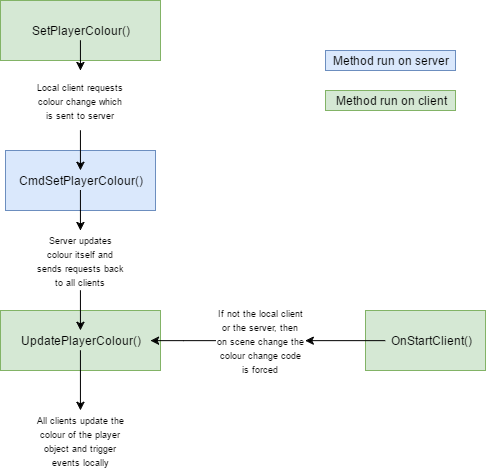
}This code has one function, and multiple ways of accomplishing it. That function is to keep data synchronised for our player. Whenever a client wants to change their colour, they will call SetPlayerColour(). This will then call the server using CmdSetPlayerColour(), which will update the colour for the server (note the [Command] attribute that enforces a request from a client to a server).
As our server is authoritative and we have [SyncVar] on the variable, the server will send the new value for the colour to every client. The (hook = "UpdatePlayerColour") part of the [SyncVar] attribute stops our clients from automatically updating the value and instead call the hooked method, UpdatePlayerColour(). This method, finally, updates the variable on the client, changes the colour, and then sends an event to any listeners that the colour has changed.
Important bit of information alert! When you open a new scene, the variables are automatically filled, but the [SyncVar] hooks are not called. This is what the OnStartClient() method is here for. If this is data for a remote client then this method forces a colour update and events triggered.
As repeatedly just mentioned, this code also has built-in event listeners for updates. This is to allow any other code, if it knows the player object, to register events against it. This is particularly useful for UI events, which we'll get to eventually in the lobby code.
There's currently a downside to this code in that if you were to run server-only code (as in, without a client on the server) then you'd likely find your server not being updated, but that can be solved by extending the CmdSetPlayerColour() code, which isn't done here for cleanliness.
We also wouldn't really want to update the colour in PlayerDataForClients. Preferably this would occur using the event next to it, but we're going to cover the code behind making that happen in a later blog, so here it stays for the moment.
Who manages the managers?
We now have two new bits of code. One that stores data our local player, and one that updates the colours for all players when set. To complete this then, we need a final piece that sets the initial colour for our local player, and stores it for other scenes.
// Player/SyncedData/LocalPlayerDataManager.cs

using UnityEngine;
using UnityEngine.Networking;

namespace Player.SyncedData {
    public class LocalPlayerDataManager : NetworkBehaviour {

        public PlayerDataForClients clientData;

        public override void OnStartLocalPlayer()
        {
            LocalPlayerDataStore store = LocalPlayerDataStore.GetInstance();
            if (store.playerColour == new Color(0, 0, 0, 0)) {
                store.playerColour = Random.ColorHSV();
            }

            clientData.SetColour(store.playerColour);
            clientData.OnColourUpdated += OnPlayerColourUpdated;
        }

        public void OnPlayerColourUpdated(GameObject player, Color newColour)
        {
            LocalPlayerDataStore.GetInstance().playerColour = newColour;
        }
    }
}
What do you know? This is that code that we said we just needed. What are the chances? Anyway, this is attached to the player prefab so that when a local player object is instantiated, a colour is either freshly picked or recalled from the store, and then set using PlayerDataForClients. When the event confirms that the colour was set, that colour is saved into the local store.
Putting it all together
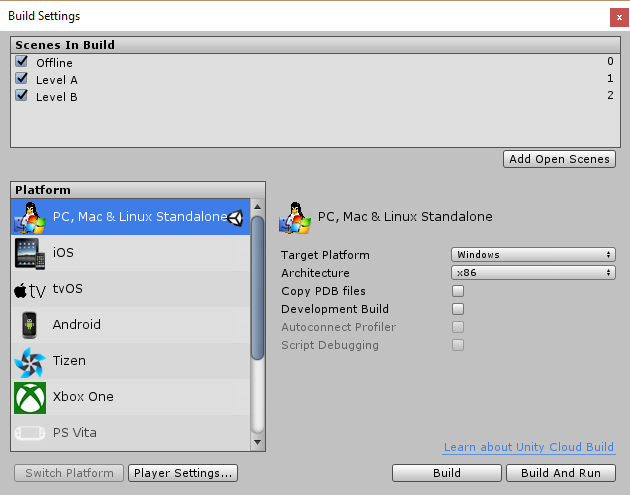
Now we have our code, it's time to make the changes required to our Unity project. First up, let's rename the "Online" scene to "Level A". You may need to reattach this to the NetworkManager in the "Offline" scene.
Next up, duplicate your "Level A" scene by saving it as "Level B". Go to the "Level B" duplicate of the "Load Scene" button you created earlier and change the event scene name to point back to "Level A". Add this scene to your build settings and you should have a window that looks like:
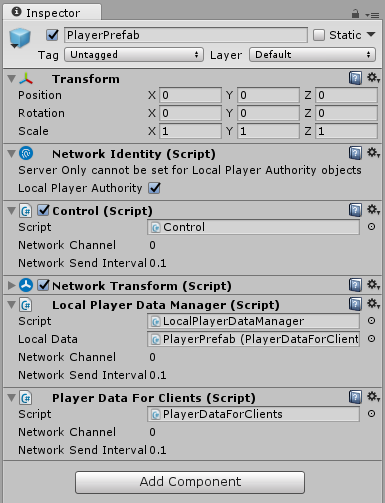
Lastly, we need to update the PlayerPrefab with the new code we've just created. The LocalPlayerDataStore is a standalone singleton, so we don't need to worry about that, but the other two need attaching to our prefab. Note that the manager actually contains a reference to the data for clients code. This is simply to save a GetComponent() call.
Before testing this, all that's required is creating a couple more level scenes and add a Load Scene button to each of them so we can jump between scenes and check the colours work. That should give us something that looks like:
Next time, we're still going to avoid the HUD. There's a few tools that could be very useful for our UI so we're going to build them first.
The code for this post can be found at github.com/dittto/unity-multiplayer-2.