How to build an Alexa app, part 3

As normally has to happen with trilogies, we eventually come to the final part. Unfortunately this trilogy is more likely to be Robocop or Spider-Man rather than Back to the Future or the (original) Star Wars. This is because pretty much all of the interesting Alexa-related stuff has already been covered in part 1 and part 2.
This means that this final entry will be covering how we can set up our Lambda for Alexa to be built using Serverless (and how we can test it locally). We'll also cover the basics of setting up your Alexa app using Amazon's tool, although their docs for that aren't actually terrible.
Lastly, and probably least as far as most people are concerned, I'll cover the basic Docker settings I use for this.
Serverless
A quick introduction to Serverless then. It's a great way to build and test AWS Lambda services. Quick enough? Good. Oh, all right then. In a similar way to Cloud Formation, it provides an easy way to create and manage not just your Lambda services, but also any (most?) AWS services, such as S3 buckets, IAM roles, DynamoDB, etc.
To put another way, Serverless can make looking after every AWS service we need for creating an Alexa app really easy.
First up, follow the basic instructions for install Serverless to your development environment. If you're going to use the Docker instructions later on in this post then you can ignore this step: serverless.com/framework/docs/getting-started.
Once you've set it up, go to your working folder and create a file called package.json. This is to allow us to install the important JS code:
{
  "name": "AlexaTest",
  "version": "0.0.1",
  "description": "Alexa test code",
  "main": "handler.js",
  "dependencies": {
    "alexa-sdk": "^1.0.0",
    "serverless-shared-vars": "^1.0.2"
  }
}
This defines two dependencies - alexa-sdk which I expect you can work out allows us to control Alexa easily, and another called serverless-shared-vars. Assuming this is still needed (it's been a while since I did any heavy Serverless work), this allows you to easily share variables between your Serverless config and your codebase. If you've looked at the code in part 2, you'll see this used to pass through the DynamoDB table name.
This code also makes the assumption you either have already or are going to store your main code in a file called handler.js.
With this file created, run the following to download all of the additional code we'll need for this project:
npm installOnce that finishes, we're going to want to create a new file called serverless.yml. This file is the main Serverless control file:
service: alexa-test

frameworkVersion: ">=1.4.0 <2.0.0"

plugins:
  - serverless-shared-vars

provider:
  name: aws
  runtime: nodejs6.10
  region: ${self:custom.shared.region}
  iamRoleStatements:
    -
      Effect: "Allow"
      Action:
        - 'dynamodb:*'
      Resource: arn:aws:dynamodb:${self:custom.shared.region}:*:table/${self:custom.shared.dynamodb_table}

functions:
  alexaTest:
    handler: handler.alexaTest
    events:
      - alexaSkill

custom:
  shared:
    region: eu-west-1
    dynamodb_table: alexa_test

resources:
  Resources:
    AlexaTestTable:
      Type: AWS::DynamoDB::Table
      Properties:
        TableName: ${self:custom.shared.dynamodb_table}
        AttributeDefinitions:
          -
            AttributeName: userId
            AttributeType: S
        KeySchema:
          -
            AttributeName: userId
            KeyType: HASH
        ProvisionedThroughput:
          ReadCapacityUnits: 1
          WriteCapacityUnits: 1
This does a lot of things, but put simply this registers serverless-shared-vars as an active plugin, sets up an IAM user so what the Lambda can read the DynamoDB store, sets up the function we're going to use, and lastly defines how the DynamoDB table should work.
This last bit is the same for any Alexa app so can be copied (apart from the provisioned throughput as that's just down to how popular you think your app will be and how much cash you have to give to Amazon).
If you want to create your Lambda in AWS and you want to be able to test it, just run:
serverless deployLocal testing with Serverless
Now you (hopefully) have your basic setup with Serverless working, let's go through how to do some basic testing. At the heart of it, an Alexa app is simply a piece of JavaScript that's expecting an input that it can process as to provide an output.
Therefore, if we know what an input should look like and what format they follow, we can fake them and provide an easy way of testing our code.
We're going to look at two examples of requests to apps, so we can dissect them and find out how they work. First up, create a file called lib/01-initial-request.json.
{
  "session": {
    "new": true,
    "sessionId": "amzn1.echo-api.session.[unique-value-here]",
    "attributes": {
    },
    "user": {
      "userId": "amzn1.ask.account.[unique-value-here]"
    },
    "application": {
      "applicationId": "amzn1.ask.skill.[unique-value-here]"
    }
  },
  "version": "1.0",
  "request": {
    "type": "LaunchRequest",
    "requestId": "amzn1.echo-api.request.[unique-value-here]",
    "locale": "en-GB",
    "timestamp": "2017-10-04T14:29:34Z"
  },
  "context": {
    "AudioPlayer": {
      "playerActivity": "IDLE"
    },
    "System": {
      "device": {
        "supportedInterfaces": {
          "AudioPlayer": {}
        }
      },
      "application": {
        "applicationId": "amzn1.ask.skill.[unique-value-here]"
      },
      "user": {
        "userId": "amzn1.ask.account.[unique-value-here]"
      }
    }
  }
}
As mentioned in a previous part, the important bits of these event requests are the session and the request. In this case the session is new and has no attributes. The request is, as expected for a new user, on LaunchRequest with no slots and no intent. This will arrive in your app with a state of "" and an intent of LaunchRequest.
If you want to test this initial state, run:
{
    "version": "1.0",
    "response": {
        "shouldEndSession": false,
        "outputSpeech": {
            "type": "SSML",
            "ssml": "<speak> Good day to you. This is a simple test application. To start, tell me your favourite colour. If you want to quit at any time, just say stop. </speak>"
        },
        "reprompt": {
            "outputSpeech": {
                "type": "SSML",
                "ssml": "<speak> Good day to you. This is a simple test application. To start, tell me your favourite colour. If you want to quit at any time, just say stop. </speak>"
            }
        }
    },
    "sessionAttributes": {
        "STATE": "state_colour"
    }
}
What this output gives us is a list of everything Alexa will output to the user, and every attribute that would be stored if we emitted a :saveState command.
If we now create another file called lib/08-choose-a-valid-shape.json and fill it with the JSON below. We've skipped a few test steps for now, but this JSON is a bit more interesting:
{
  "session": {
    "new": true,
    "sessionId": "amzn1.echo-api.session.[unique-value-here]",
    "attributes": {
      "STATE": "step_2",
      "colour": "blue"
    },
    "user": {
      "userId": "amzn1.ask.account.[unique-value-here]"
    },
    "application": {
      "applicationId": "amzn1.ask.skill.[unique-value-here]"
    }
  },
  "version": "1.0",
  "request": {
    "type": "IntentRequest",
    "requestId": "amzn1.echo-api.request.[unique-value-here]",
    "intent": {
      "name": "ShapeIntent",
      "slots": {
        "shape": {
          "name": "shape",
          "value": "circle"
        }
      }
    },
    "locale": "en-GB",
    "timestamp": "2017-10-04T14:29:34Z"
  },
  "context": {
    "AudioPlayer": {
      "playerActivity": "IDLE"
    },
    "System": {
      "device": {
        "supportedInterfaces": {
          "AudioPlayer": {}
        }
      },
      "application": {
        "applicationId": "amzn1.ask.skill.[unique-value-here]"
      },
      "user": {
        "userId": "amzn1.ask.account.[unique-value-here]"
      }
    }
  }
}
See, far more interesting. The session object now has items in it's attribute object, including the special-case STATE that tells the Alexa SDK which state we're in. Further down the JSON, you can see the updated request object. This contains an intent and slots now.
To use this one for testing, run:
serverless invoke local --function alexaTest --path ../lib/08-choose-a-valid-shape.jsonCreating an Alexa app in Amazon
Now Serverless will build our Lambda for us, we need to set up an Alexa application using developer.amazon.com. Amazon actually have decent documentation regarding this, so I'll let them cover the bulk of it using developer.amazon.com/alexa-skills-kit/alexa-skill-quick-start-tutorial
Our Lambda app is step 1, so you just need to follow from step 2. A word of warning with the developer site though, the logins aren't linked with AWS so you can have the same email address with different passwords for the two sites...
The following shows the basic settings for my test app. There's nothing hugely surprising in this one.
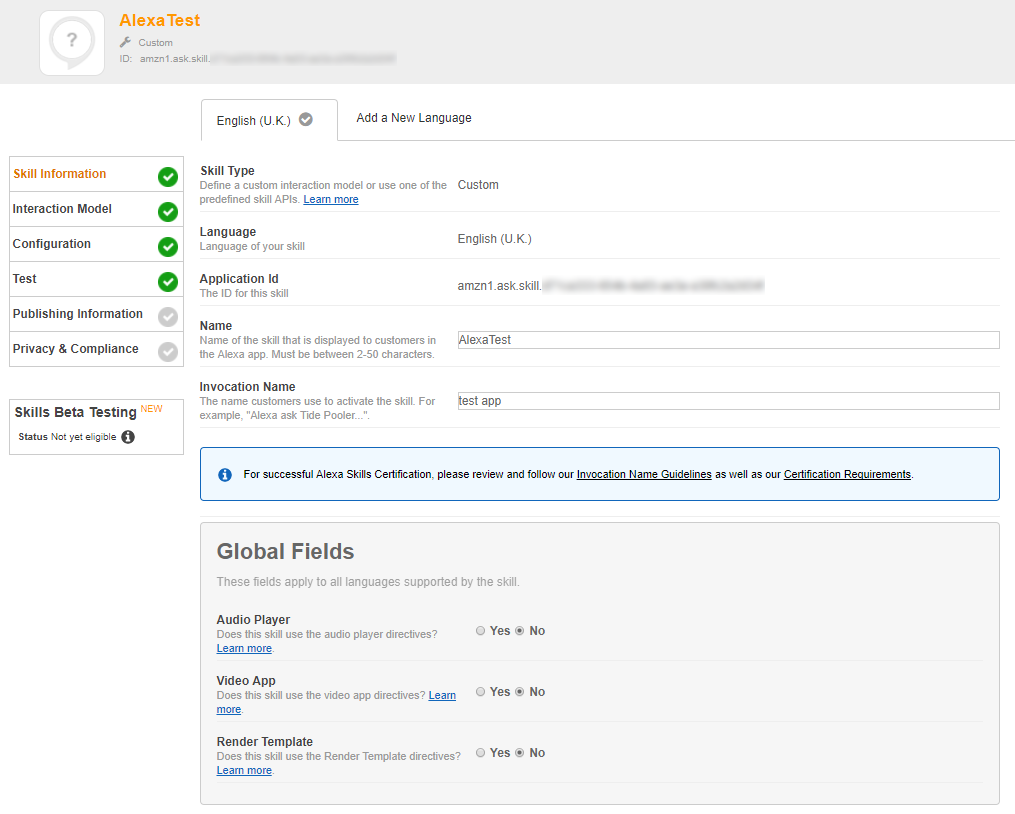
There's just the name and invocation name here.
The next step's important as it defines how we interact with our app. For our app to work, we need three things - a JSON containing a list of all intents and slots they can contain, a list of all valid slot values, and a list of utterances.
Here's what the three things will look like once you've added them to the developer.amazon.com:

To make these, we'll need to manually build them. First then, the intents.
{
  "intents": [
    {
      "intent": "ColourIntent",
      "slots": [
        {
          "name": "colour",
          "type": "LIST_OF_COLOURS"
        }
      ]
    },
    {
      "intent": "ContinueIntent",
      "slots": [
        {
          "name": "continue_option",
          "type": "CONTINUE_OPTIONS"
        }
      ]
    },
    {
      "intent": "ShapeIntent",
      "slots": [
        {
          "name": "shape",
          "type": "LIST_OF_SHAPES"
        }
      ]
    },
    {
      "intent": "AMAZON.StopIntent"
    }
  ]
}
This isn't a list of every intent, but it is a list of all custom intents across all states. The two states that aren't included in this list are default Alexa states: LaunchRequest and Unhandled.
An intent is defined with a list of slots that contain the name of the slot as we'll refer to it in code, and the type which we'll see in a moment.
LIST_OF_COLOURS
red
green
blue
yellow
white
black

CONTINUE_OPTIONS
Yes
No

LIST_OF_SHAPES
square
circle
triangle
cross
This is a list of slot types and their possible values. To add these, you have to use the Custom Slot Types UI in the image above.
Lastly, we have the utterances:
ColourIntent My favourite colour is {colour}
ShapeIntent My favourite shape is {shape}
ContinueIntent {continue_option}
These are a list of example phrases users will use to control your Alexa app. There aren't many here as it's a test app, but I'd expect there to be a lot for a full-scale app.
The final screen we're going to cover in developer.amazon.com is the Lambda configuration page:
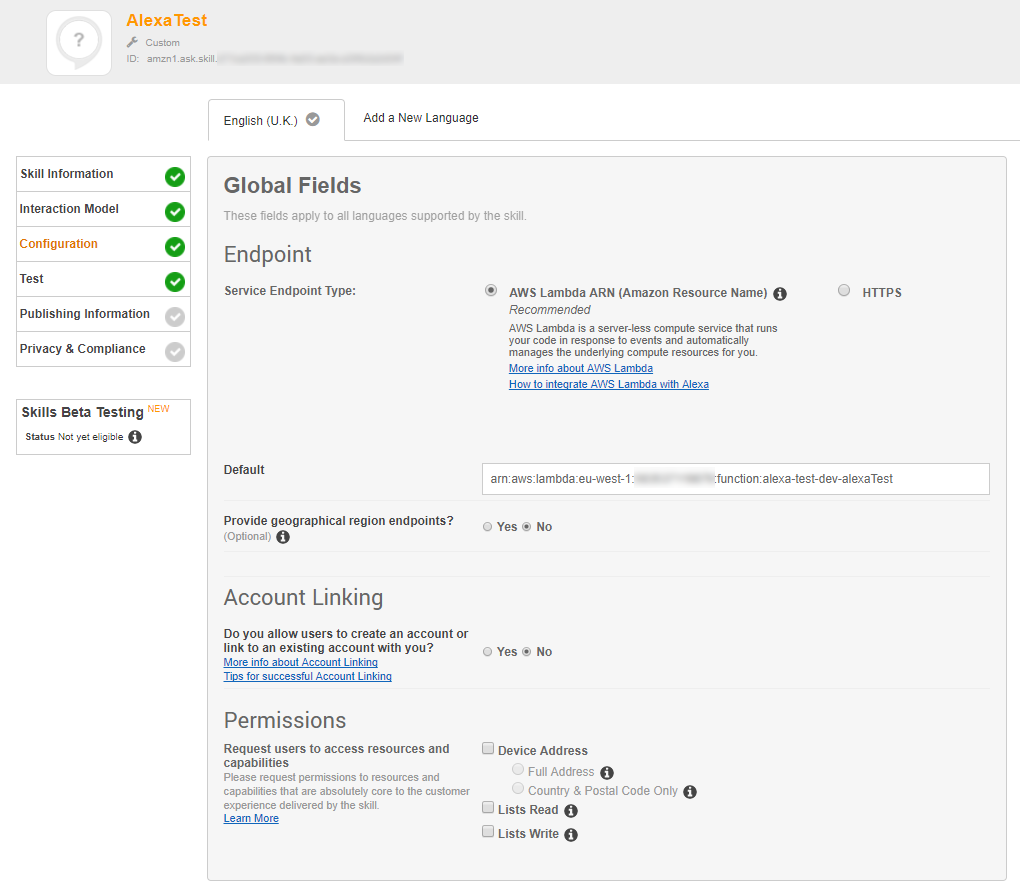
Note that you can write your own endpoints using a simple HTTPS endpoint, but this tutorial is about using Lambda, so we're going to use that.
The Default field is the ARN of your Lambda function. You can get the function name part of the ARN from running serverless deploy, or going into the AWS console and looking at your Lambdas.
After you have completed this page of setup, you'll be able to test your Alexa app on any Echo's associated to your email address.
Docker
I'm going to start with the assumption that you know what Docker is and how it works. If not, I'm going to be covering how to do basic setup for dev and prod in a couple of blogs' time.
I work with a lot of languages, and it's helpful to not have everything installed on my laptop at the same time. It's also helpful to know that if I lose or break my laptop, I don't have to set up all of my development environments again. That's why I choose to use Docker for things like this.
The following is the Dockerfile I use for my test app. This Dockerfile is purely for testing my app and then pushing the changes to Lambda:
FROM debian:8
# Install basic software for server
RUN apt-get update && \
apt-get upgrade -y && \
apt-get install -y \
curl \
git \
vim \
wget
# Install node and serverless
RUN curl -sL https://deb.nodesource.com/setup_6.x -o nodesource_setup.sh && \
bash nodesource_setup.sh && \
apt-get install -y \
nodejs \
build-essential && \
npm install serverless -g
# adds aws command line
RUN curl -O https://bootstrap.pypa.io/get-pip.py && \
python get-pip.py && \
pip install awscli
COPY ./etc/aws.config ~/.aws/config
COPY ./etc/aws.credentials ~/.aws/credentials
# Clean apt-get
RUN apt-get clean && \
rm -rf /var/lib/apt/lists/*
# Fix vim controls
RUN echo "set term=xterm-256color" >> ~/.vimrc
WORKDIR /var/alexa-test
CMD ["tail", "-F", "-n0", "/etc/hosts"]
This, very simply, sets up a container with a basic Debian server, NodeJS 6.x (to match Lambda's version), Serverless, and AWS CLI for configuring AWS credentials.
Containers are designed to run a task until it's over, which isn't always useful when you want them running for development. To get around this, the last line creates what is effectively an infinitely-running command.
After you've created the above Dockerfile, you'll also need a docker-compose.yaml:
version: '2.0'
services:

    alexa-test:
        build:
            context: .
            dockerfile: Dockerfile
        container_name: alexa-test
        environment:
            SLS_DEBUG: "*"
        volumes:
            - .:/var/alexa-test

    alexa-dynamo-db:
        image: cnadiminti/dynamodb-local
        container_name: alexa-dynamo-db
This allows us to create multiple containers at a time, and also preset certain options. In this case, for our main alexa-test container we use our local Dockerfile, set Serverless into debug mode so we can track any errors easily, and tell Docker to use our local folder as part of the file system inside the container.
The second container defined here creates a fake DynamoDB, which would be useful for testing if bug #140 is ever merged, so can probably be removed.
Useful commands
Now we have our docker files described and our serverless setup, all you need to do is follow the instructions:
cd ~/alexa-test
docker-compose up -d --build
docker exec -it alexa-test bash

cp etc/aws.config ~/.aws/config
cp etc/aws.credentials ~/.aws/credentials

npm install
serverless deploy
These instructions will take you from fresh code to deploying a Serverless AWS Lambda application, ready to be added using developer.amazon.com.
If you need to stop your Docker containers, just run:
cd ~/alexa-test
docker-compose down
And that's it. An Amazon Alexa app in three easy(ish) steps. If you want the source code for this test app, you can get it all from github.com/dittto/alexa-test-app.