How to build an Alexa app, part 2
If you hadn't guessed from the title of this blog post, this is a follow up to How to build an Alexa app, part 1. If you've not read that one first, I'd suggest doing so, as this will probably not make any sense. Chances are it won't anyway, but if you've read any more of my blog you'd have figured that out yourself.
Anyhoo, the first part hopefully covered what an Alexa app is, how it works, and some basics into states and intents. This post will cover how to respond to the user, how to save the user's states, and also a simple example app with some explanation of why I'm doing things. With some luck, you'll have read all the bits above it first so it makes sense as to why I'm doing what I'm doing.
There will be a final part to this post next time that covers how to set this up using Serverless, how to test using Serverless, and a very basic guide to setting it up in Alexa enough to test with an actual Echo.
Responding to the user
Briefly touched on in the last blog post, this is kind of an important step so should probably have it's own section. Some point during your intent code, you're going to want to feed back to the user what your intent has done and now wants from them.
There are two main types of response which Amazon refer to as either ask and tell or speak and listen. I'm going to refer to them as questions and statements though, as I think it's a bit more descriptive.
Statement
A statement is normally the end of your communication with the user. After a statement, your app will give full control back to the user and Alexa will wait for the next "Alexa ..." command from them. I say "normally", as you could easily design your app to pick up later, but the user would have to say to an Alexa command to continue.
Two ways of creating a statement are:
'AMAZON.StopIntent': function () {
    this.response.speak('Ok, good bye');
    this.emit(':responseReady');
}

// or

'AMAZON.StopIntent': function () {
    this.emit(':tell', 'Ok, good bye');
}
The this.emit('tell') code may look shorter and easier to use, but updating the response first and returning that gives you the flexibility to use some of Alexa's more advanced features such as images and video on the Echo Show, or the audio player. I'm not going to cover them now, but maybe later if I can convince Amazon to give me an Echo Show ;)
Question
We use a question to keep the app going. It's a request for the user to provide more information so we can work towards a statement and end the app. As mentioned before, to prevent your app locking up someone's Echo, the response time for a question is a miserly 8 seconds.
If this runs out without a response from the user then a repeat question will be asked. If no response is received within another 8 seconds, the app will end. There is currently no way around this (I looked. A lot...).
As above, two ways of creating a question are:
'Unhandled': function () {
    this.response
        .speak('I didn\'t quite get that. What is your favourite colour?')
        .listen('I said, what is your favourite colour?');
    this.emit(':responseReady');
}

// or

'Unhandled': function () {
    this.emit(':ask', 'I didn\'t quite get that. What is your favourite colour?', 'I said, what is your favourite colour?');
}
Saving progress
Although basic apps don't need to remember what the user was doing, it gives a nice bit of additional interaction for them. For more complex applications, it's probably required.
There are a couple of ways to save the current progress of a user. An Alexa app is simply a Lambda, so you have full access to AWS and it's various services. This means that you can write your saved data to anything you want. Amazon gives you access to a unique user id, so you can track them using:
console.log(this.event.session.user.userId);Most of the time though, you're going to want to get the Alexa SDK to automatically handle most of the leg work regarding saving a user's data. To do this, you'll need to make sure your DynamoDB has been created With a single, string HASH key of userId and that your Lambda has permissions to control it, or you could just use Serverless which I'll cover later.
Once the DB's set up, you'll need to tell Alexa you want to use a DynamoDB:
const Alexa = require('alexa-sdk');

module.exports.alexaTest = function (event, context, callback)
{
    const alexa = Alexa.handler(event, context);

    ...

    alexa.dynamoDBTableName = 'dynamo_db_table_name';

    alexa.execute();
};
Lastly, you'll need to add data your attributes, set your state, and then tell your Intent it needs to save the data:
'ColourIntent': function () {
    ...

    this.handler.state = 'shape_state';
    this.attributes['colour'] = 'red';
    this.emit(':saveState', true);

    ....
}
The above code sets the state to a new state, stores a colour in the attributes store, and then emits a ":saveState" for the Alexa SDK to handle for us.
Logging and debugging
Every now and then (very often) you'll get bits of your code that you'll want to keep and eye on or try and work out why it doesn't quite work as expected. With Lambda (and also with Serverless), you can simply add a console.log() to your code.
When running live, these console logs are added to the related CloudWatch logs for your Lambda application. For instance, the output of console.log(this.event) looks like:
2017-10-18T19:42:07.144Z 7437cf79-9ca9-11e7-baf7-0535ec832a71

{
    version: '1.0',
    session:
    {
        new: false,
        sessionId: 'amzn1.echo-api.session.c1773001-b2ee-4f49-af0b-195217f000bd',
        application: { applicationId: 'amzn1.ask.skill.8d5c4e51-439b-4fbd-b1bb-5905c8b7e502' },
        attributes: { STATE: 'state_shape', colour: 'red' },
        user: { userId: 'amzn1.ask.account.AFKCZ7RF66UBQ2OMRMDJZVGS5NXHIAKT25RD4K2LDKTQCVXTFVF4Q73AIFSGMFKN6TTUMUJD5TK2SCVN44QNBP5GGDGOP7UVRDA5DOHZR3Z2DI5JGSHNA3ZYHPOMOETYSSCJ3AYEYTLULY6TNVFP4QIXM3N3ZOL2BSRVSY5ZJP7QYYBXEQAXDWJWUUBBQEDP365HQMBT7RVRTLY' }
    },
    context:
    {
        AudioPlayer: { playerActivity: 'IDLE' },
        System:
        {
            application: [Object],
            user: [Object],
            device: [Object],
            apiEndpoint: 'https://api.eu.amazonalexa.com'
         }
    },
    request:
    {
        type: 'IntentRequest',
        requestId: 'amzn1.echo-api.request.3eb32069-0ae3-4c85-bc1e-177832518a31',
        timestamp: '2017-10-18T19:42:07Z',
        locale: 'en-GB',
        intent:
        {
            name: 'ShapeIntent',
            confirmationStatus: 'NONE',
            slots: [Object]
        }
    }
}
There's a lot of JSON here, but the interesting ones to look at are session.attributes for how the state is stored as an attribute, so be careful you don't conflict with it, session.user.userId as we saw that used above, and request.type and request.intent to see how intent and slot data is stored.
When using serverless for testing, you can just console.log() anything out and see it inline.
A working example
On to the important bit of this post then. Firstly, if you want to see the full source code for this example, go to github.com/dittto/alexa-test-code . This version's going to stop after each section and explain what and why I've done certain things.
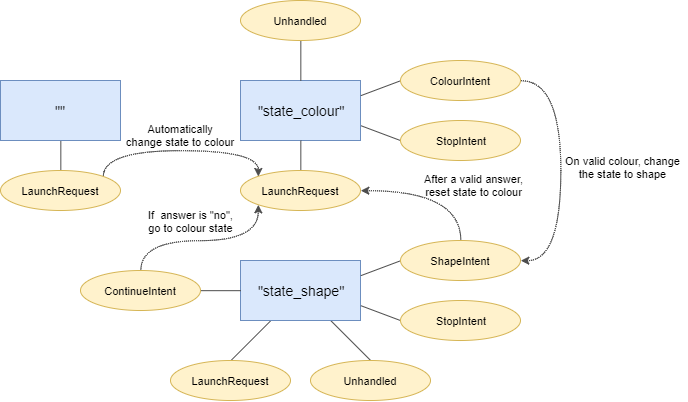
Above shows a simple diagram of the states and intents for this test app.
const Alexa = require('alexa-sdk');
const SharedVars = require('serverless-shared-vars').get();

module.exports.alexaTest = function (event, context, callback)
{
    const alexa = Alexa.handler(event, context);

    alexa.registerHandlers(initialUseHandler);
    alexa.registerHandlers(colourHandler);
    alexa.registerHandlers(shapeHandler);

    alexa.dynamoDBTableName = SharedVars.dynamodb_table;

    alexa.execute();
};
This is main function for our Alexa app. It sets up a basic Alexa handler based upon input, registers our handlers which we'll define later, store our DynamoDB table name that's passed through from the Serverless setup and then runs it all.
There is currently an existing flaw in the Alexa-SDK that will make your tests ugly, though. There is no way to swap out the database connection that it creates with another. This means that there's no way to currently use the local DynamoDB. There is a PR someone's made, but we've got for it to be pulled.
const states = {
    COLOUR_STATE: 'state_colour',
    SHAPE_STATE: 'state_shape'
};

const colours = [
    'red',
    'green',
    'blue',
    'yellow',
    'white',
    'black'
];

const shapes = [
    'square',
    'circle',
    'triangle',
    'cross'
];
Next we define all of our constants for this test. We have two states (and the initial state but we never want to redirect there so can ignore it from this list), a load of colours, and a particular set of shapes (sorry Xbox).
const initialUseHandler = {
    'LaunchRequest': function () {
        this.handler.state = states.COLOUR_STATE;
        this.emitWithState('LaunchRequest');
    }
};
The first of our handlers is relatively simple. This is our initial use handler who's job is to redirect the code to a repeatable state instead. In this case, it's the colour state.
const colourHandler = Alexa.CreateStateHandler(states.COLOUR_STATE, {

    'LaunchRequest': function () {
        let message = '';
        switch (this.event.request.locale) {
            case 'en-US':
                message = 'Yo. What up? This is, like, a simple test app. What\'s yer favourite colour? If yer wanna quit then screw you and just say stop.';
                break;
            case 'de-DE':
                message = 'Schönen Tag. Dies ist eine einfache Testanwendung. Um zu beginnen, sagen Sie mir Ihre Lieblingsfarbe. Wenn Sie jederzeit aufhören wollen, sagen Sie einfach "Stop".';
                break;
            default:
                message = 'Good day to you. This is a simple test application. To start, tell me your favourite colour. If you want to quit at any time, just say stop.';
        }

        this.handler.state = states.COLOUR_STATE;
        this.attributes = {};
        this.emit(':saveState', true);

        this.response.speak(message).listen(message);
        this.emit(':responseReady');
    },
The first intent a user will (properly) land on is this LaunchRequest. Based on how the Echo the user is using is set up, the request event will send over a different locale. This intent shows how to create a different message based on different locales.
Because a user can be redirected here from other states, this intent also resets the state and attributes for a user before saving them.
To keep things simple for a test, the intent responds with the same message for both the question and the repeated question.
    'ColourIntent': function () {
        const slots = this.event.request.intent && this.event.request.intent.slots ? this.event.request.intent.slots : {};
        const colour = slots.colour ? slots.colour.value.toLowerCase() : '';

        if (colours.indexOf(colour) === -1) {

            this.response.speak('I don\'t know that colour. Try again with another');
            this.response.listen('Are you still there? Try another colour');
            this.emit(':responseReady');

            return;
        }

        this.handler.state = states.SHAPE_STATE;
        this.attributes['colour'] = colour;
        this.emit(':saveState', true);

        this.response.speak('Great. What is your favourite shape?');
        this.response.listen('I said, what is your favourite shape?');

        this.emit(':responseReady');
    },
Once a user has stated a colour, they should end up here at the ColourIntent. If the user doesn't state a colour we recognise, then they'll be asked for another. If they get one we know of then we save their colour, set the state to "state_shape", save it, and ask them for a shape next.
You'll notice the slight weirdness of an Alexa app here, in that you always tend to handle a response from the user and create a request for the user in a single intent. This is the natural way you hold a conversation, but it can lead to repeating yourself a lot.
A way around this is to have additional functions that cope with the responses and requests separately, but that seems a bit much for an example app.
    'AMAZON.StopIntent': function () {
        this.response.speak('Ok, good bye');
        this.emit(':responseReady');
    },

    'Unhandled': function () {
        this.response.speak('I didn\'t quite get that. What is your favourite colour?');
        this.response.listen('Do you have a favourite colour?');

        this.emit(':responseReady');
    }
});
I'll cover these two together as they're relatively basic. If a user wants to quit the application, then we just say good bye as a statement.
On the other hand, if they responded with a shape to the colour request, or Alexa simply didn't understand them then they'll end up in the Unhandled intent. Here we just need to get them back on the right track with a simple question.
const shapeHandler = Alexa.CreateStateHandler(states.SHAPE_STATE, {

    'LaunchRequest': function () {
        const colour = this.attributes['colour'];

        this.response.speak('Welcome back. Your favourite colour was ' + colour + '. Would you like to continue from here?');
        this.response.listen('Would you like to continue, yes or no?');

        this.emit(':responseReady');
    },
The second state a user will end up in for asking their favourite shape. If they've run this app before, said their favourite colour but quit before saying their favourite shape then they'll end up in this LaunchRequest intent.
So they don't get too confused, we'll give them the opportunity to continue or restart.
    'ContinueIntent': function () {
        const slots = this.event.request.intent && this.event.request.intent.slots ? this.event.request.intent.slots : {};
        const option = slots.continue_option ? slots.continue_option.value.toLowerCase() : 'no';

        if (option === 'no') {
            this.handler.state = states.COLOUR_STATE;
            this.emitWithState('LaunchRequest');

            return;
        }

        this.response.speak('What is your favourite shape?');
        this.response.listen('What is your favourite shape?');

        this.emit(':responseReady');
    },
The ContinueIntent is for handling those returning users. You may have noticed that you need to cover off all possible entrances and exits to your app as you don't want your users to get lost or Alexa to crash out.
If someone answered "no" to the continue question, they will be redirected back to the start of the colour state to re-play this app. Otherwise we'll ask them for their favourite shape again.
    'ShapeIntent': function () {
        const slots = this.event.request.intent && this.event.request.intent.slots ? this.event.request.intent.slots : {};
        const shape = slots.shape ? slots.shape.value.toLowerCase() : '';

        if (shapes.indexOf(shape) === -1) {

            this.response.speak('I don\'t know that shape. Try again with another one');
            this.response.listen('Are you still there? Try another shape');

            this.emit(':responseReady');

            return;
        }

        const colour = this.attributes['colour'];

        this.response.speak('So your favourite is a ' + colour + " " + shape + ". Great. Thanks! Bye!");

        this.handler.state = states.COLOUR_STATE;
        this.attributes = {};
        this.emit(':saveState', true);

        this.emit(':responseReady');
As with the ColourIntent from the previous state, the ShapeIntent first checks if the user's chosen a valid shape. If they haven't we'll try again until they get it right. Otherwise, we'll respond with a statement of their favourite colour and shape.
Before we leave though, we'll reset the state and attributes back to as close to the original as possible. As we can't reset the state to '', we have to do the next best thing and set it to "state_colour".
    'AMAZON.StopIntent': function () {
        this.response.speak('Ok, good bye');
        this.emit(':responseReady');
    },

    'Unhandled': function () {
        this.response.speak('I didn\'t quite get that. What is your favourite shape?');
        this.response.listen('Do you have a favourite shape?');

        this.emit(':responseReady');
    }
});
Lastly, as with the colour state, we need two intents for users who want to quit, and for when Alexa doesn't quite understand what they're saying.
That's it for this blog post. Next time, we'll cover setting up a Serverless app for testing / deploying your Alexa app, a quick run through of how to setup Alexa enough to test with a real Echo, and a simple Docker setup so you can run this from where ever you are.
As long as you promise not to cheat and look ahead for the next post's stuff, the source code can be found at github.com/dittto/alexa-test-app.