How to build an Alexa app, part 1

I figured I'd take a break from the usual programing to look at Alexa (the Amazon Echo). I've been tossing ideas around for a while now for an interesting Alexa project but kept putting off learning how to do it as it always seemed just a bit too complex to devote any time to.
There was a fun gamejam in Guildford a few weeks ago where I thought that a little Alexa game would be a nice idea. I ended up doing something different with Unity but it did give me some time to finally delve into Alexa's documentation.
Unfortunately it's as Amazon as it comes. If you've ever used AWS then you may know what I mean. Amazon have a tendency to write documentation like a miner suffering from fatal exposition syndrome while trying to escape a collapsing tunnel.
The stuff they explain tends to be useful and also not so useful, and stuff you may need on a day ending in "q", but it pretty much always only covers how to get a single point. It's only when you get to the light at the end of the tunnel that you find it's not daylight but actually an old torch.
You're now stuck with retracing your steps while trying to work where you went wrong and have seriously tortured a metaphor while doing so.
I'm going to cover what I consider to be both a streamlined and more comprehensive version of their instructions, and also how to set up your Lambda function to build with Serverless, because it makes building, updating, and maintaining Lambda functions really easy (and I already have some plugins I made for it).
The Lambda app
Below is a link to the following code I based this example off of. It's the official Alexa example on how to build a decision tree, which is pretty much the bulk of interesting things to build with Alexa. It's pegged to an exact commit as they change their code relatively frequently:
https://github.com/alexa/skill-sample-nodejs-decision-tree/blob/cb26237756465c9b285fcabab1ebb72e366f7824/src/index.js
It shows you how to do create a simple (ish) app which handles different states (we'll come to them later), and how to handle different intents for those states (we'll also come to that later as well). Then it shows you more states, and more intents, and more states and more intents. It belabours the point worse than floccinaucinihilipilification.
Request and response
First, then, let's cover some basics of an Alexa app. Alexa effectively follows a request / response model after you start your app. You can start it by saying "Alexa use
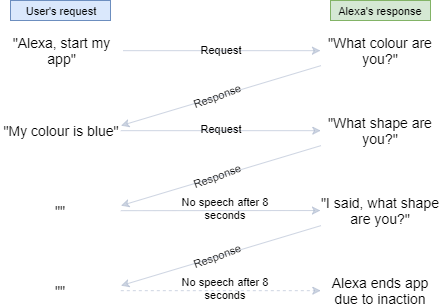
You can send questions or statements from Alexa as a response. A statement will end your Alexa app. A question will keep you in the loop. Well, as long as a user responds within a certain timeframe currently it's 8 seconds. If a user fails to respond to the question put to them within the 8-second window, Alexa will ask a repeated phrase. This can be your original question, or something a bit more organic.
If you don't ask anything after the repeated phrase, Alexa will just turn your app off as the user's obviously not paying attention. Usefully, Amazon do appear to be looking into extending / altering this 8-second timeout completely, which would be nice.
One important thing to note from this is that the user can only respond to Alexa when the blue light is on. As Paddy McGuiness may say (but probably not) - no lighty, no listen-ey.
This means you can't interrupt Alexa as the blue light only comes on when she stops speaking. Alexa can't filibuster you though, as she only has a maximum 90-second execution time. This includes all speech or associated audio. If you exceed 90 seconds, it may just not work. After Alexa's speech, she has to stop speaking and spend some time listening
States and intents
An easy way to look at Alexa apps is as a collection of States and Intents. I like to look at states as rooms and intents as things available in those rooms, but that may be a because of a predilection towards adventure games.
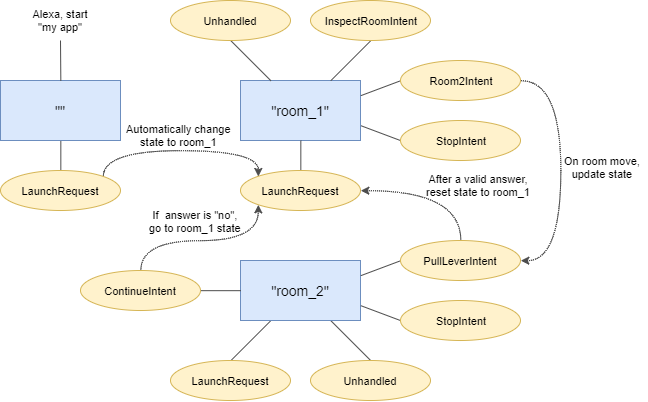
If we stick with that analogy though, then we can know that once you enter a state, you can conduct any related intent in any order. If you change state, you can then use any of the intents related to the new state. Except under special circumstances, you can't use an intent from another state.
Intents are the actions we wish to conduct while in a given state. These actions tend to revolve around receiving a piece of information, processing it and deciding how Alexa should respond to it. For example:
const colourHandler = Alexa.CreateStateHandler('state_colour', {
    ...

    'ColourIntent': function () {
        // TODO: process input from use
        // TODO: fail if not an allowed colour
        // TODO: otherwise, store colour
        // TODO: change state to 'state_shape'
        // TODO: respond with question for shape
    },

    'AMAZON.StopIntent': function () {
        // TODO: response with goodbye statement
    },

    ...
});
The above example is part of a simple Alexa app that asks a user to pick a colour and then a shape. The code snippet defines one state (state_colour) and refers to another (state_shape).
Two separate intents are shown above. The first handles what happens when someone states a colour and is a fairly standard custom intent. The second is a built-in intent for stopping something in Alexa. In this case, we use it to stop the app, but you can use the built-in intents to do anything you want to.
Intents
To define an intent, you need to create it in 3 places. The first is in the code, as above. The second and third are added to the Alexa app creation tool in the annoyingly named developer.amazon.com (which handily uses your main Amazon login, which is a different login to AWS where you'll save your Lambda code). These form two different formats. The first is a JSON that defines all possible intents, regardless of state.
{
  "intents": [
    {
      "intent": "ColourIntent",
      "slots": [
        {
          "name": "colour",
          "type": "LIST_OF_COLOURS"
        }
      ]
    },
    {
      "intent": "AMAZON.StopIntent"
    }
  ]
}
The above shows how intents are defined in the JSON for our related JS snippet. For the ColourIntent, I've also defined a single slot for it. This is so we can define the list of colours we'll accept. These are also added via same tool as above, but as a slot with a type and a list of possible answers. In this case, the slot type is LIST_OF_COLOURS. The name field shown above is how the JS will refer to this slot.
In JS, you can get the data for a slot by adding the following code to an intent:
const slots = this.event.request.intent && this.event.request.intent.slots ? this.event.request.intent.slots : {};
const colour = slots.colour ? slots.colour.value.toLowerCase() : '';
The third and final place to define an intent is, again, in the Alexa app creation tool. You need to tell Alexa what people will say to trigger your intent. These are called utterances. Example utterances for the colour intent are:
ColourIntent My favourite colour is {colour}
ColourIntent I like the colour {colour}
The value in the {} brackets is the name of the slot mentioned above.
Initial states
Above, I created a state called state_colour. When a user first starts the application, they have no set state, so will default to ''.
We're going to cover how to save your Alexa app next blog post, but for now let's just remember that we can save the state and related attributes for any given user. We normally do this in DynamoDB, but this causes us some issues as DynamoDB doesn't like to store empty values, such as ''.
This means that it's harder to change the state value to something and then try and change it back to the initial state. A way to avoid this issue is to define a very, very simple initial state that just redirects the user to another state.
const initialUseHandler = {
    'LaunchRequest': function () {
        this.handler.state = states.COLOUR_STATE;
        this.emit('LaunchRequest');
    }
};
There are two vaguely interesting (on a particularly boring day) things about this code. One is that unlike the previous state description, this one doesn't use the longhand Alexa.CreateStateHandler. This is because if it's not used, when initialUseHandler is registered as a state handler, it will default to:
Alexa.CreateStateHandler('', initialUseHandler);The second vaguely interesting thing is how we conduct a redirect. We can set a state and then emit an intent name. In this case the intent is called LaunchRequest, which is a special case we'll cover in a sec as the third vaguely interesting thing.
We'll cover it more later with the example code, but emit is how we tell the Alexa API what to do, such as move around the intents, return a response from our code, or save the current data about our user. When emitting an intent name, you cannot also update a response, although you can save data.
LaunchRequest
There are a couple of times in you code's lifecycle that an intent is not specified. This is when you have a new (unsaved) user load your app for the first time, or an old user reload your app to a saved state.
When this occurs, a user will be taken to the LaunchRequest intent (if it exists) for the given state they're in. As such, this intent always needs to cope with new or returning users, such as:
const shapeHandler = Alexa.CreateStateHandler('state_shape', {
    'LaunchRequest': function () {
        // TODO: get the existing colour as must be set by now
        // TODO: respond with the colour and question as to if the user would like to continue
    },
    ...
});
Unhandled
Above I said that a user will be taken to a LaunchRequest if it exists. If it doesn't, or the user requests something that either doesn't make any sense, or matches an `utterance` but one that belongs to an intent in a different state, then the code will try to use an `Unhandled` intent in the state.
You do need to be careful here though, as Alexa's still quite dumb, so will quite often end up what it thinks matches the speech best, even if it's wrong. This means that your intents need to error-check their inputs to make sure they're valid, and respond accordingly if not.
const colourHandler = Alexa.CreateStateHandler(states.COLOUR_STATE, {
    ...
    'Unhandled': function () {
        this.response.speak('I didn\'t quite get that. What is your favourite colour?');
        this.response.listen('Do you have a favourite colour?');

        this.emit(':responseReady');
    }
});
This unhandled intent simply asks again for the favourite colour. You could also choose to redirect them towards some form of help, professional or otherwise.
I don't like splitting tutorials up, but this one's already getting more than a tad long, so I'm going to stop it here and next time cover how to save state, how my simplified, but more useful example code works. For a final one, I will also cover how to get it working and testing in Serverless.